
Planning a Trip on the HST (High Sierra Trail)
- Permit Process
- Cost of Trip
- Parking and Transportation
- Necessary Gear
- Water Sources
- Safety and Hazards
- Itineraries
- Time Required
- Rules and Regulations
- Highlights of the Trail
Step One
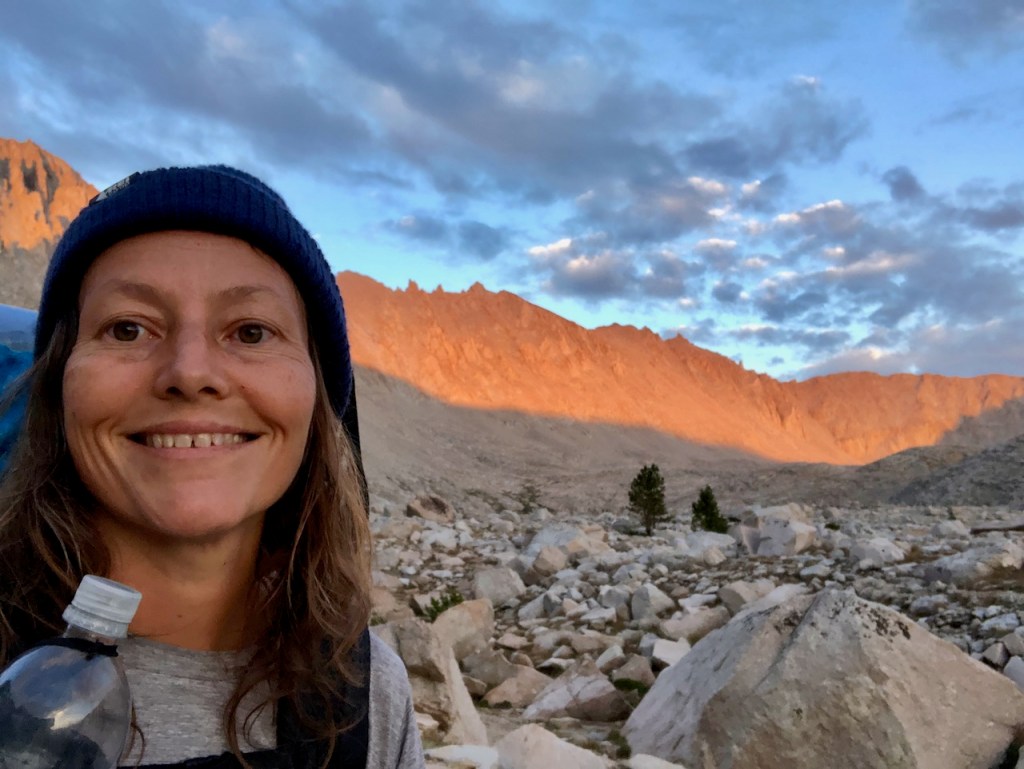
The first step in thru-hiking the High Sierra Trail (HST) is get up the nerve to hike 80+ miles in the wilderness, into the middle of nowhere and over one of the tallest peaks in the US, which is Mount Whitney, elevation 14,501 feet. A thru hike is a type of hike where you hike from point A to point B, to a terminus. The terminus of the High Sierra Trail is Whitney Portal.
Reservations
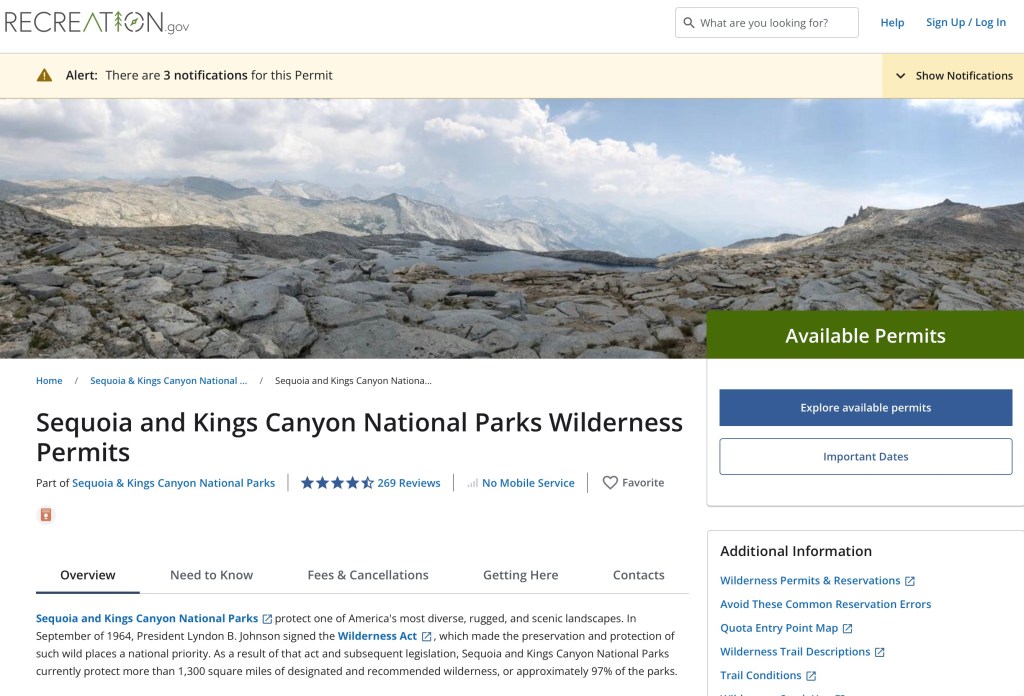
Once you have gotten over the nerve, of hiking 80+ miles, the next step is to obtain a wilderness permit through Recreation.gov for Sequoia and Kings Canyon, for the High Sierra Trail. I obtained a permit during the quota season, where only 30 permits are issued per day for the HST. Twenty are reservable online, and another 10 are available as walk up permits. This is subject to change, so calling the ranger station is advised, for the dates you plan on going.
You can also check when permits are available on the Outdoor Status site.
About Wilderness Permits
These are permits which allow you to camp in the backcountry overnight. You do not need a permit for a day hike in the wilderness, except for certain trails, with high popularity, such as Mount Whitney, and Half Dome. You can have up to 6 wilderness permits at a time through recreation.gov, and they are refundable up to over 7 days prior. Some permits can be fully non-refundable though. It depends which permit you are talking about. Even when there were dangerous wildfires in Yosemite, and it was filled with smoke, my backcountry permits were not refundable. That confounds me to this day, since you would think they would not want more hikers to be in danger. I think it was since permits are only cancelled when a fire is actually burning a trail, not before. So even natural disasters and closures, will not result in a refund.
Non-Quota Season
The non-quota season for hiking on the High Sierra Trail varies by year, and in 2022, it was between September 18, 2022 and May 25, 2023. This is a off peak season, when it is least popular, and desirable to visit the wilderness. But if you enjoy winter weather, and snow, the non-quota season, can be a great time to visit.
Get Notified of My Latest Posts
I will be sending out a weekly digest of new posts, and a once monthly newsletter.
The HST in Early Fall
There is a small window from late September into October, where people will set out on the High Sierra Traill, aware that they may encounter snow, ice, and winter conditions. With proper training, this is a viable option for some, especially if you have a larger experienced hiking group with mountaineering experience, who are unable to get a permit in the peak season.
The Reservation Window
Reservations can be made up to six months in advance of your trip, and are released daily at 7:00 AM. So since I wanted to hike the High Sierra Trail in July, I made my reservation, back in February. You can still find permits later on, but if your hiking with a large group, it will be tough to find them, other than as a walk up. As a solo hiker it is easier to find a permit, late in the game. You can list up to 3 alternate trip leaders, and they cannot be added post checkout. Don’t pick the wrong trailhead for where you want to go, by reviewing this list of trailheads.
Permit Pickup
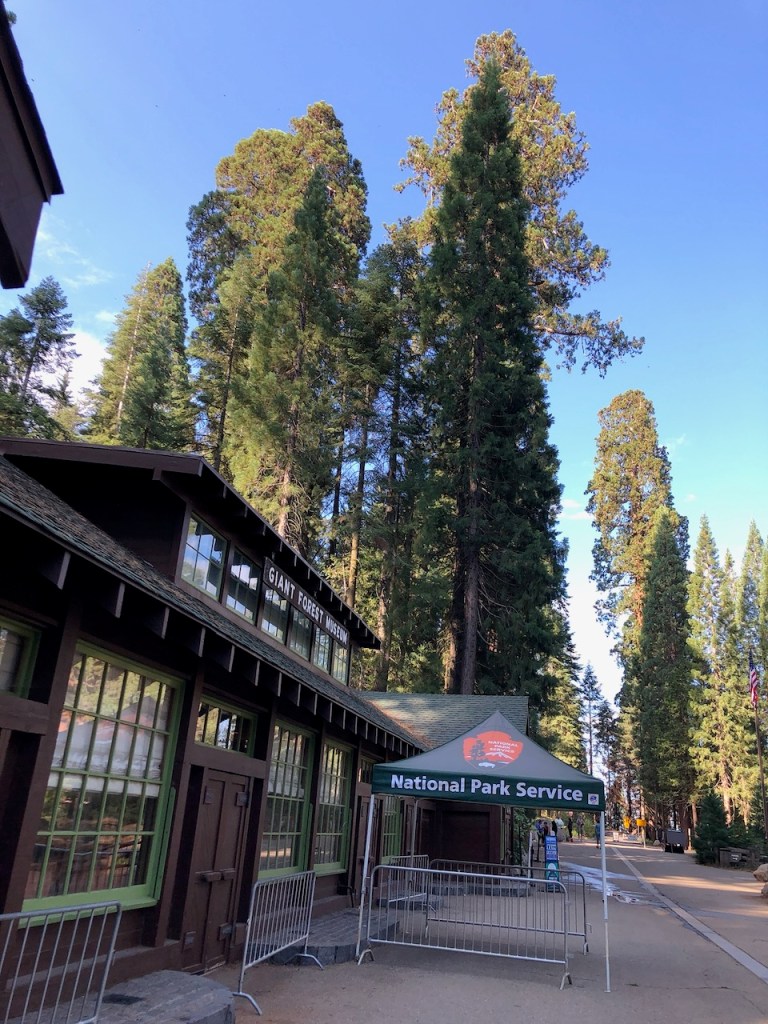
You pick up your permit for wilderness hikes at the issuing station nearest the trailhead. For the High Sierra Trail, this is the ranger kiosk next to the Giant Forest Museum, beneath the famous sequoia tree, “Sentinel.” Once there, the ranger will discuss with you details of the route, and alternative camp sites you might not be aware of during an orientation, where all traveling should attend. You can pick up permits after 1pm the day prior to your trip, but also much pick them up by 10am on the entry date. This is the most time sensitive part of the process.
Questions
Late pick ups can be accomodated with a phone call to the Wilderness Office by calling 559-565-3766. You may not get through, so it is best to call well in advance. You can also can e-mail the rangers at seki_wilderness_office@nps.gov with questions.
Research
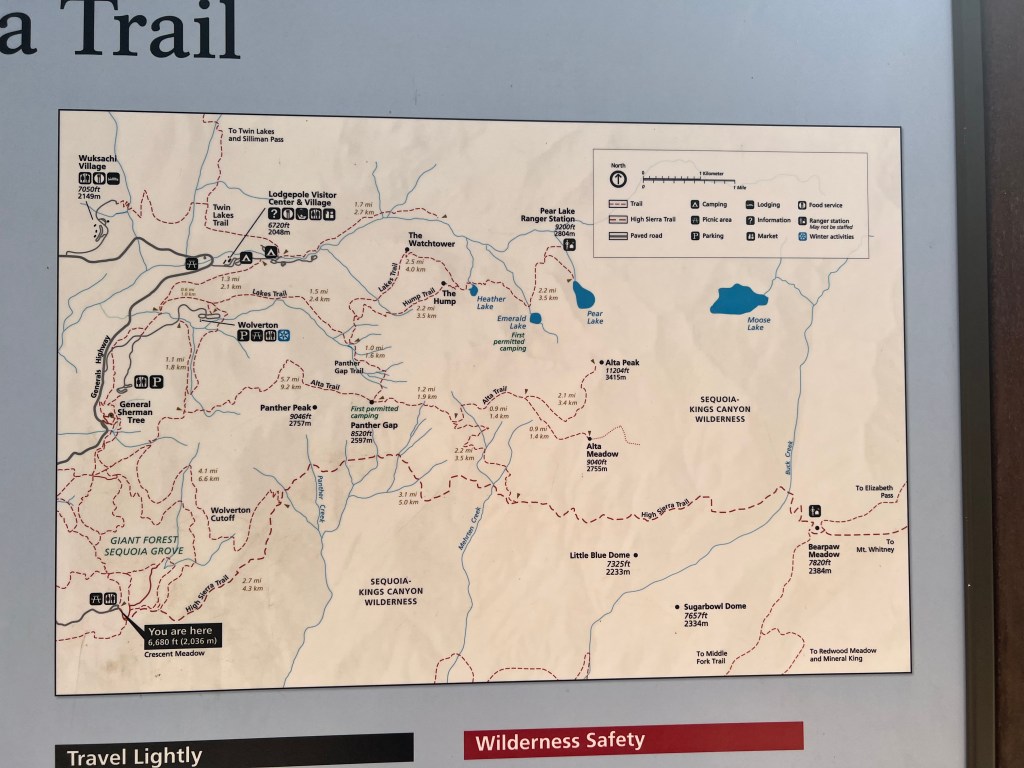
It’s best to get to know the High Sierra Trail by checking out area maps, to get a lay of the land, and understand the elevation gain involved. This will help in planning how much you want to hike each day. Some base their hikes on distance only, but I recommend taking elevation gain into account as well. Only you know your limits, so basing the hike on someone else’s experience could pose a problem, miles from civilization.
Sequoia and Kings Canyon
There are lots of great trails in Sequoia and Kings Canyon (SEKI). Some trails have multiple entry points. But that is not the case for the High Sierra Trail. It is possible to start the trail, from either Crescent Meadow trailhead, or Whitney Portal, going in the opposite direction.
Cost of the Trip
Wilderness permits cost $15 each trip plus $5 per person within the quota season, and are free during non-quota season. The majority of the expense in this trip has to do with getting to the trailhead, accommodations pre and post hike, bus fares, backpacking food costs, and of course gear. Assuming most of the gear may already be owned, that leaves travel, accommodations, and food. Some specialized gear, like the bear can, must be purchased as well, along with micro-spikes for traversing lingering late season snow or ice.
Cost Breakdown
Transportation
The expenses began with my greyhound bus ticket to Visalia, California, from Orange County, California, which was $32. Next was the Sequoia Shuttle at $20, from Visalia to Crescent Meadow. Then there was gas for the car, for my boyfriends son, who picked us up.
Accommodations
The next expense was a stay at the Best Western in Visalia which was $150 for the night. There are lots of possible options for your accommodations before and after starting the trail. We stayed here since the shuttle stopped right in front.
Food
My food for a week on the trail was about $250, including a celebratory breakfast at the Whitney Portal store. I brought lots of ProBars mostly in Superfood flavor, Backpackers Pantry meals, Instant Oatmeal, dried fruits, salty snacks like olives, popcorn, and various chips. I packed in Tortilla Wraps, hummus, and fruit for day one. I also added beet powder for altitude, lots of Nuun electrolytes, and Ricola cough drops.
Gear
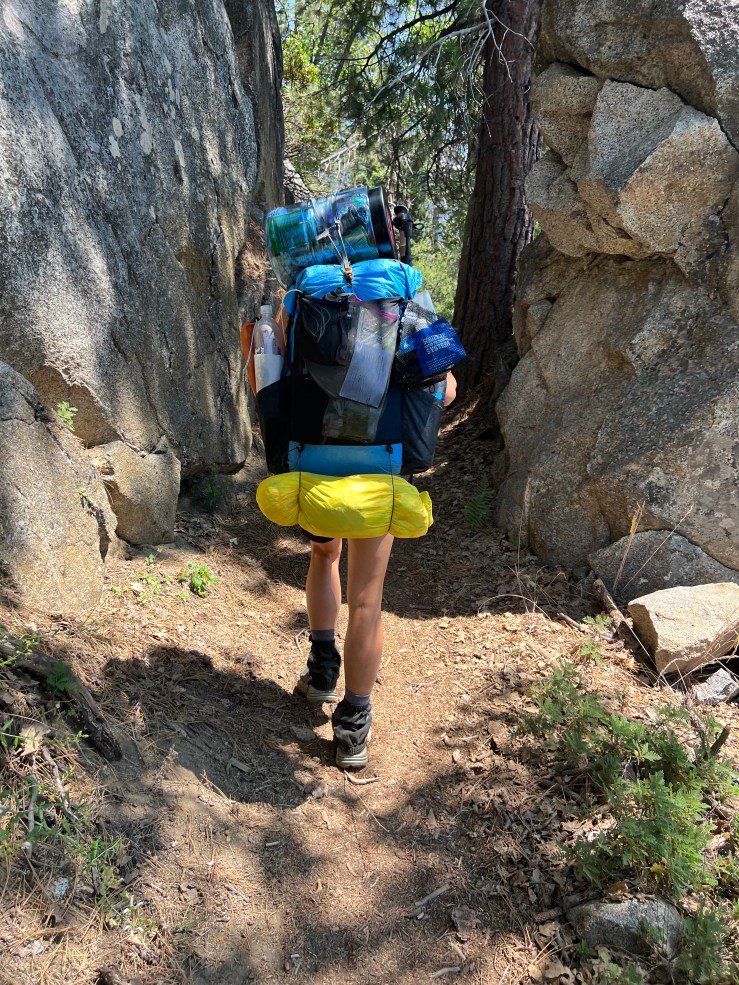
I had most of my gear already, but purchased new Brooks Cascadia trail runners for $120 prior to the start. My bear can was $60. The main pieces of gear I brought were my Zpacks Arc Air Pack, a Neoair Xlite Sleep Pad, a Sea to Summit Ascent Zero Degree Sleeping Bag, a Sawyer Micro Squeeze, a Cnoc Bag, a Toaks 750ml cooking pot, and MSR Pocketrocket stove, a bug net.
You can read my full gear list on lighterpack.com.
Permits
My permit was $15 for two people, and was purchased through recreation.gov, many months in advance. However, I ended up changing it up, when I found a new permit, in July, for a different date, so I cancelled the original one. So permits do come up later, there are just no guarantees.
Grand Total
I spent roughly $500, plus the costs of my backpacking gear I already owned. This was the ultimate cheap staycation for me, in that I live in California, in driving distance to the Sierras. Your trip depends on you, and your itinerary.
Water Sources
Day 1
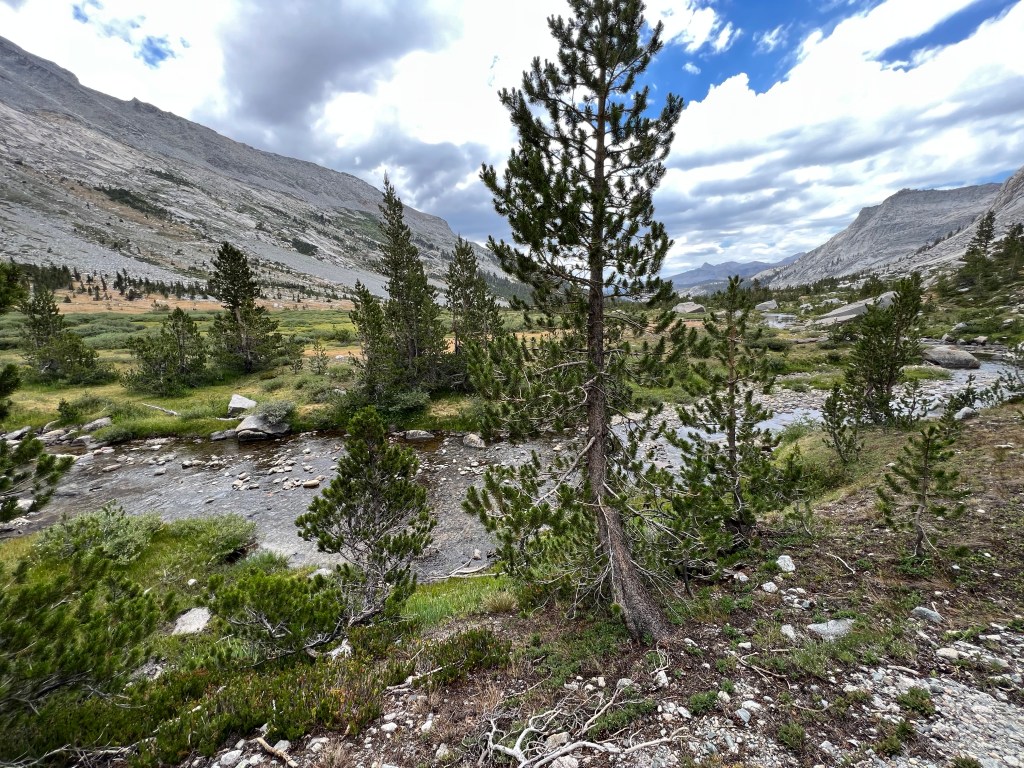
There are several water sources along the trail which are reliable throughout the year. There are several known creeks on the route from Sequoia Park to Bearpaw Meadow, such as Panther Creek, Mehrten Creek, Nine Mile Creek, and Buck Creek. Depending on how high of snow year it is, creeks can be at a trickle, or a raging river, which is treacherous to cross. Panther was at a trickle when I went. Mehrten was flowing well, but easy to cross. Nine Mile Creek had a waterfall, and pools to swim in. Buck Creek had the most potential to be difficult to cross since the area can flood. There was plenty of water along the way on Day 1.
Day 2
Hamilton Lakes was the next water source after Buck Creek, on my trek. There were several tributaries flowing along the cliffside past Bearpaw Meadow, which itself has a spigot, which was turned off, since the water infastructure is being repaired. Hamilton Lakes is the place I camped on night 2, and also where I filled up water again.
Day 3
I left with a fill 2 liters on the way to Precipice Lake, knowing I could fill up, after the big climb, which I did. Along the trail into Big Arroyo, over Kaweah Gap, there were several streams flowing, past Precipice Lake. Heading into Big Arroyo, there would be water in the creek, flowing through the center of the u shaped valley. At Big Arroyo was a flowing stream with trout swimming, which was a great water source.
Day 4
On this stretch past Big Arroyo, I was unsure how the water sources would be. I knew Moraine Lake had water, but it’s water was not meant to be great for some reason, possibly since it’s in the midst of a drainage into the Kern River Gorge. I headed toward Kern Hot Springs, into its gorge, and passed a flowing Funston Creek to the left, just before the gorge’s switchbacks. This would have been another good place to fill up. Once down the switchback of the Kern River Gorge, you have the river, to fill up in on the way to Kern River Hot Springs, which was my stop for the night.
Day 5
The Kern River flows beside the trail most of the way to Junction Meadow. There were too many small stream crossings to count along the way, which passes through a ghost forest of standing deadfall, victims of the 2021 wildfires here. After a big climb out of the gorge from Junction Meadow, you may glimpse several waterfalls. Wallace Creek could be seen flowing here off to the right, not far downslope from the trail. It does get closer at one point though, if you were in need of an emergency fill up, and did not mind climbing down about 20 feet from the trail. Continue on and you will pass the gorgeous Wright Creek, which crosses the trail, with its waterfall. This is where I filled up, and took a break. Not much further on down the trail, you will cross Wallace Creek, where some may camp for the night. It was decided to press on to Guitar Lake for today. I passed by Crabtree Meadow, which has water, though I did not partake in it. It’s about a half mile off trail to camp here. On the way to Guitar Lake there were several streams flowing off to the right of the trail, where I filled up again for the climb over Mount Whitney. Timberline Lake was off limits for camping, and I assume water fill ups. Guitar Lake is not supposed to be the best source for water, but is an option, if you did not fill up already.
Day 6
I planned to not filling up again until Trailside Meadows, where Lone Pine Creek flows well. The second choice was to fill up down at Outpost Camp, where you meet up with Lone Pine Creek once again. This was since Trail Camp’s water is not meant to be that great, and Constellation Lake is a bit off trail. There is no water on summit of Mount Whitney, except maybe melting snow. There was no snow there when I climbed it. On the switchbacks heading down, there was a flowing spring I crossed several times, where I could have filled up, if needed. From what I hear this one is intermittent, and not dependable. I camped right beside Lone Pine Creek, which was nice, and I only had 3 miles to go to the portal from there.
Day 7
It was on to Whitney Portal. Along the way from Outpost Camp, I passed along Lone Pine Creek, since it runs along the meadow south of Outpost Camp. Further along, the trail intersects with Lone Pine Creek again, and its many waterfalls. There was a small tributary of Lone Pine Creek about a mile or so from the portal. All in all the trail provided in terms of water during my 2022 late July trek on the High Sierra Trail.
Safety and Hazards
Seasonal Weather
There are several related weather hazards that occur in the Sierras. Snow, avalanches, rain, hail, lightening, floods, rockslides, and wildfires, are all common, depending on the season. Checking the current conditions a year prior to when you want to travel on the High Sierra Trail is helpful, to know what to expect if you can. It’s also advised to check the conditions, close to when you are about to leave, and the day you are leaving. Having a Garmin In-Reach enables you to track weather changes along the way.
Mountain Weather
It might be blue skies all morning on the way up Mount Whitney, but typically after 11am, is when clouds move in, and storms roll through. It’s not uncommon in July, August, and September, for there to be rain, thunder, wind, hail, and lightening storms, around high peaks like Mount Whitney during the afternoon.
Road Closures
There can be rockslides anytime of the year, floods, and avalanches that may close the roads into Sequoia Park or Whitney Portal. Check for closures, since this can effect shuttles, leaving from the trailhead, and getting picked up.
Falling and Injury
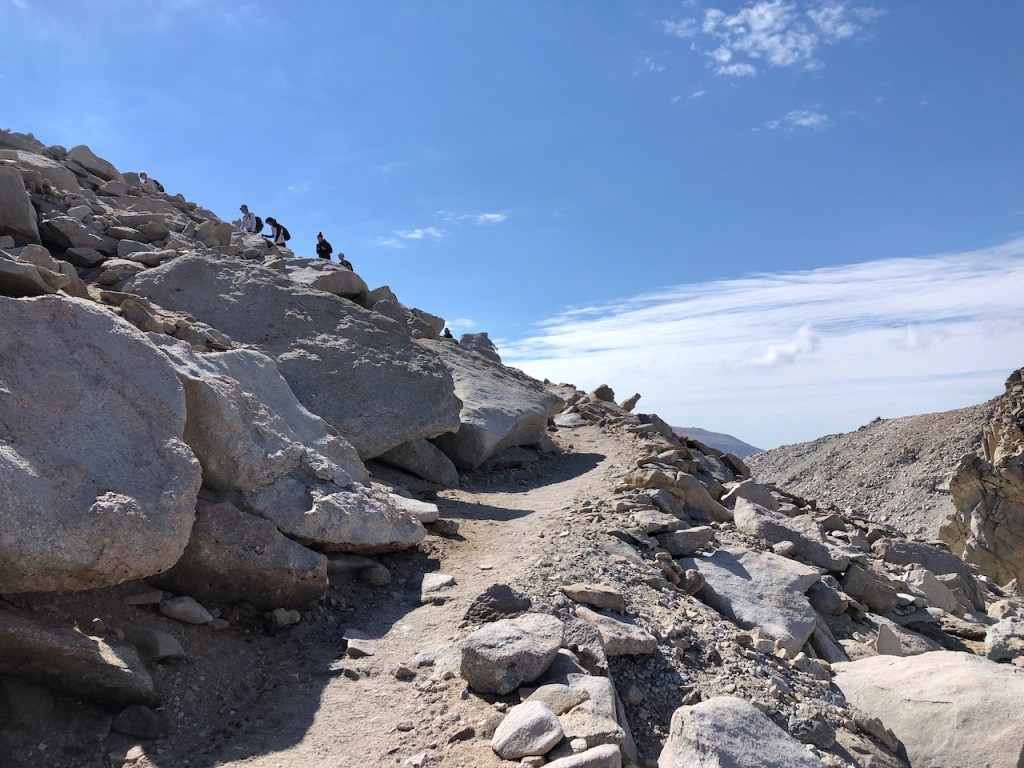
Some stretches of the High Sierra Trail have sheer drop offs, along the cliff sides. I stayed to the inner granite wall, used my poles to push toward the wall, and generally kept a close eye on the trail. The last thing I needed was to trip on a loose rock, and fall down a hillside. Falls are the way most people have died in the wilderness. The area around cables going down Mount Whitney has also claimed lives, as has Mount Whitney itself, higher on up, during inclement weather conditions. High winds, could literally blow you off a cliff. It’s best to stay away from the edge. I’m not covering the mountaineers route, because that is not hiking, it’s mountaineering. I am not an expert mountaineer by any means. The E-ledges of that route have also claimed lives, so I have heard.
Wildlife
Attacks from wildlife are very rare. Every type of wildlife lives here in the Sierras. Some are not seen as much like the Marmot. Black bears, deer, foxes, mountain lions, bobcats, rattlesnakes, as well as chipmunks, all call the Sierras home. There are golden trout swimming in many of the lakes, rivers, and streams. Remember it is their home, not ours, so leave no trace. Try not to wear chemicals that can be washed off in the waterways of the Sierras. I wore little sunblock on the trip. A sun shirt is a better choice. Remember a fed bear is a dead bear. The best thing to do when encountering wildlife is leave them alone, but also to make your prescence known. Bear bells let the bears know your coming. If you see a mountain lion, do your best to appear threatening by yelling, banging stuff, and raising arms in the air. Read more about what to do when encountering wildlife here on the National Parks website.
De-Hydration
Hypothermia, Hydration, and Heat are the 3 H’s to be aware of in regard to exposure. The sun can be much stronger at altitude. Staying hydrated, taking electrolytes, and getting enough carbs for energy, are all important at higher elevations.
Hypothermia
One of the biggest worries is hypothermia. Staying dry is important, especially when temps dip into the 50’s or cooler. If it starts to rain, be sure to take shelter as soon as possible. I like to set up my tent, wherever I am and wait it out. If hiking in the rain, be sure all the most important gear you have, is safely stowed in dry bags in your pack, even if the pack itself is not waterproof. Once gear is soaked, you cannot possibly stay warm, and can die of exposure. Incoming storms can prevent rescue in this situation. Pack covers do not work at all for keeping things dry. This was learned the hard way, by my boyfriend on this trip. Even a basic trash compacter bag, can save your life, by keeping gear, like your down sleeping bag, warm and dry. Hand warmers, such as sold in outdoors store also come in handy.
Windchill
Wind chill can be be another factor of concern. Imagine your cold, and soaked. Then the wind starts blowing. Just carrying an emergency blanket, the same as are given out to runners post race, can be a lifesaver. Be sure to have windproof layers, like rain pants, or wind pants. Dance pants are an inexpensive, ultralight, windproof option, popular with ballet dancers, and hikers.
Treating Gear with DWR
Spraying your pack with DWR finish can help bead water off. Check with the manufacturer, to see if the fabric is suitable first. Regularly check if your rain gear is beading water, and re-apply DWR before heading into the Sierras. The same goes for your tent. Be sure everything is clean and free of dirt before you do.
Altitude
Hiking to over 14,000 foot peaks such as Mount Whitney has claimed many lives, due to altitude sickness. Even at lesser elevations, it is possible to feel unwell. If you are prone to high blood pressure, you may want to think twice about the High Sierra Trail and Mount Whitney. Heart rates and blood pressure rise at altitude, which explains why someone with a lower natural blood pressure, or atheletes, with typical low resting heart rates, do well at altitude, while others struggle. Consult with you doctor to make the best choice. Once you are deep within the Sierras, getting back out is not as easy. Bringing canned oxygen is another option to consider, such as Boost. I am not a believer in altitude pills, but some people take prescriptions for it.
Drowning
A fall in the Kern River, has led to many untimely deaths since the power of this river, is not always apparent on the surface. Buck Creek can become flooded as well, after a big snowmelt, or monsoon rains. Lakes are another place to use caution since submerged trees, and rocks may not be visible from the surface. The water is also not quite as buoyant as the ocean, and there are no lifeguards, so swimming is at your own risk. If you are confident in your swimming abilities, and enjoy cliff diving, or simply jumping in off a rock, taking an investigative swim first to know what is underneath could avoid catastrophe.
Exit Strategies
Pressing the SOS button is a last resort. There is never a guarantee you will be rescued. There is no guarantee your rescuers will make it there, or be safe themselves in coming to your aid.
Bailing Out
Exiting to the south trail along the Kern River Gorge is one option, if you already are struggling with the altitude near the Precipice Lake, and Kaweah Gap at close to 11,000 feet. Lower Kern River Trail, can be taken to Golden Trout Creek Trail, on to Horseshoe Meadows, rather than continue on higher, and over Mount Whitney. It becomes Little Whitney to Big Whitney Trail and eventually Cottonwood Pass trail. There will be one more climb to 10,000 feet but it is not nearly as high as Mount Whitney or Trail Crest.
More Options
A second bailout option is to hike south, from just before Crabtree Meadow, on to Cottonwood Pass, via the PCT, aka the John Muir Trail. This route travels at a higher altitude the whole way, at over 10,000 feet, but will take you to Horseshoe Meadows instead of over Whitney. This is a good option if storms are forecast, or conditions on Whitney become dangerous, and you can’t afford to wait it out. Mount Whitney will be there, and it’s never good to risk life and limb just to climb a mountain. Check out maps beforehand to know the best exit routes, for you, and your comfort zone.
Itineraries
The Sequoia and Kings Canyon website for the High Sierra Trail suggests a 6 day itinerary. You should use your own best judgement, and be prepared for an extra day or two in the wilderness with extra food. In general people hike this trail in 5-8 days, depending on their pace, or how long they wish to spend in the wilderness.
Rules and Regulations
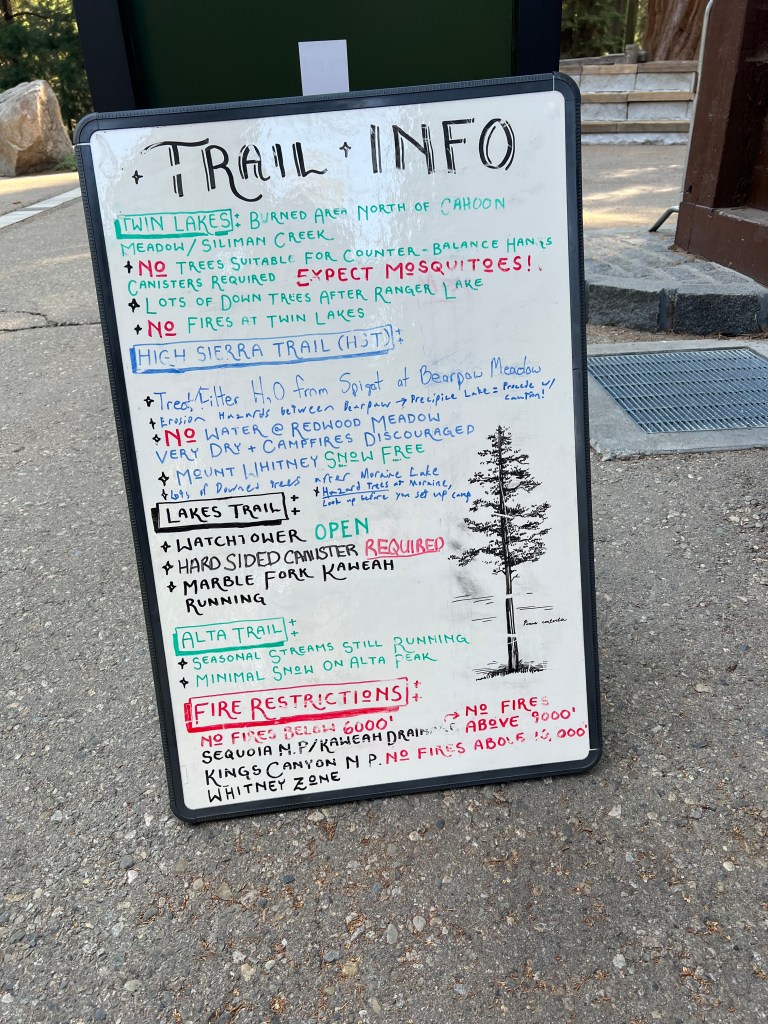
There are certain rules to be aware of when camping in the wilderness here, that are specific to this area. The first is food storage, which must be in a bear proof container, a bear can, or be kept in the bear proof box at most campgrounds. Most people had a food bag, stored in the bear boxes at each site I visited. I saw very few visible bear cans, but you are required to have one. There are also limits on the number of nights you may camp at a particular site, and where you can camp. Your meant to camp only in established areas. Bear spray and weapons are not allowed on this trail. What constitutes a weapon is listed and defined here. There are lots more do’s and don’ts, revolving around the principle of having a minimal impact on the environment. So when in doubt, leave not trace. You need wag bags for the Mount Whitney zone, which is nobody’s favorite part of hiking this trail.
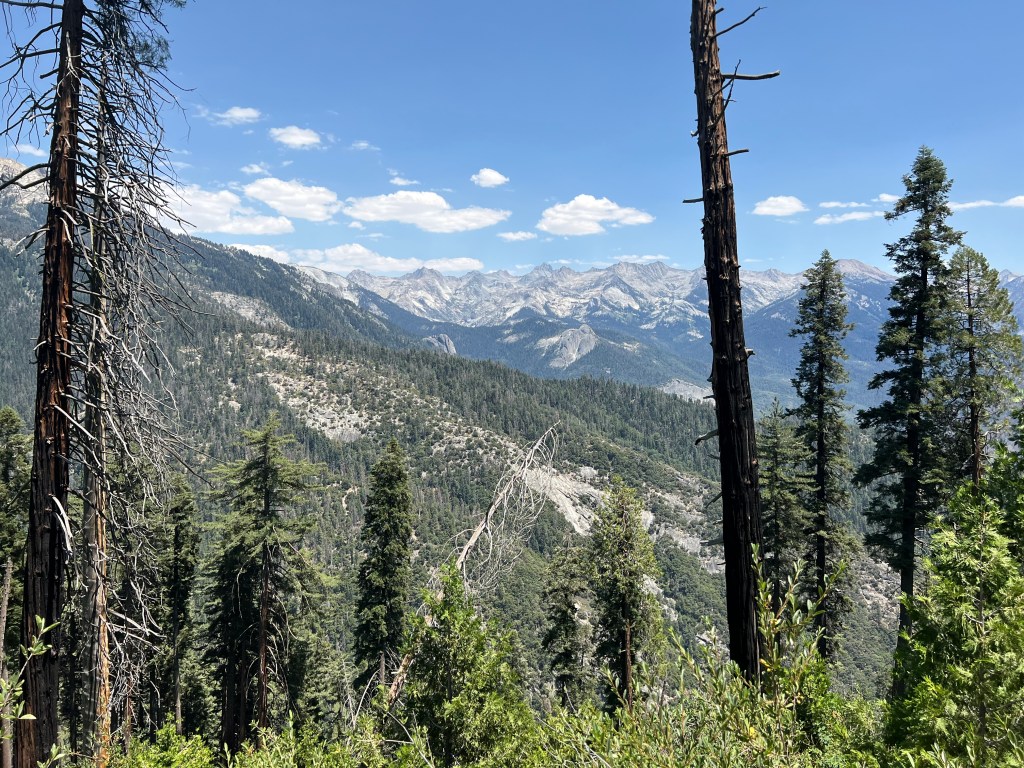
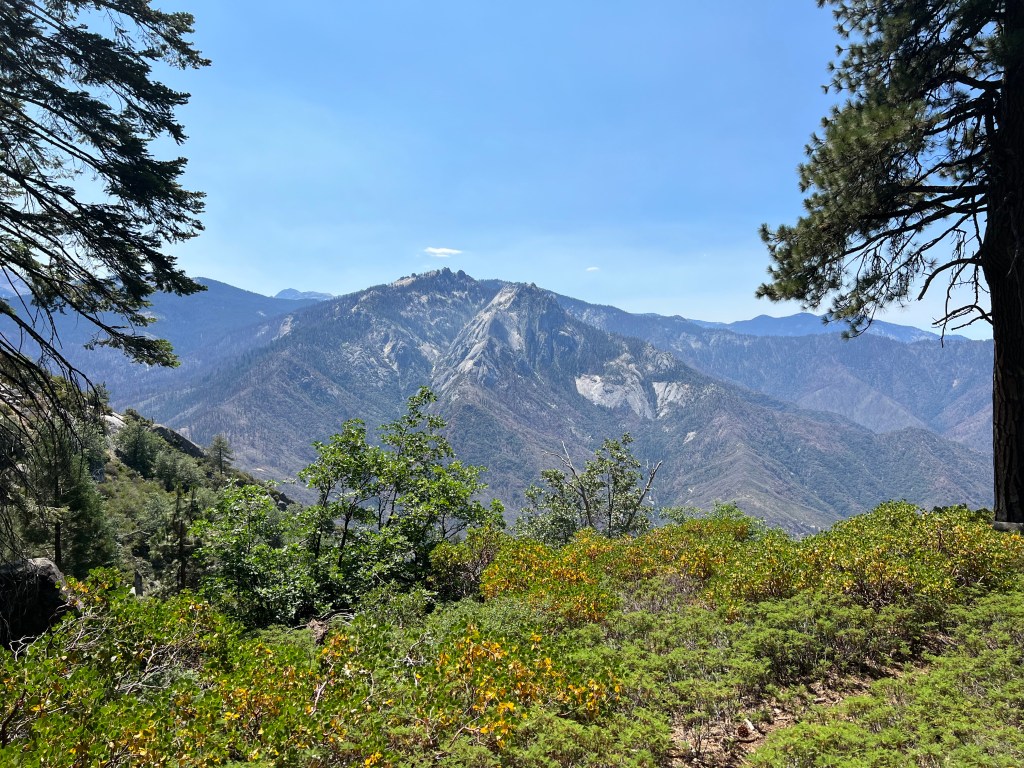
Highlights of the Trail
Some of the most beautiful scenes along the trail began with the waterfalls and creeks you pass by on Day 1. Then on Day 2 you edge ever closer to several spectacular granite domes.
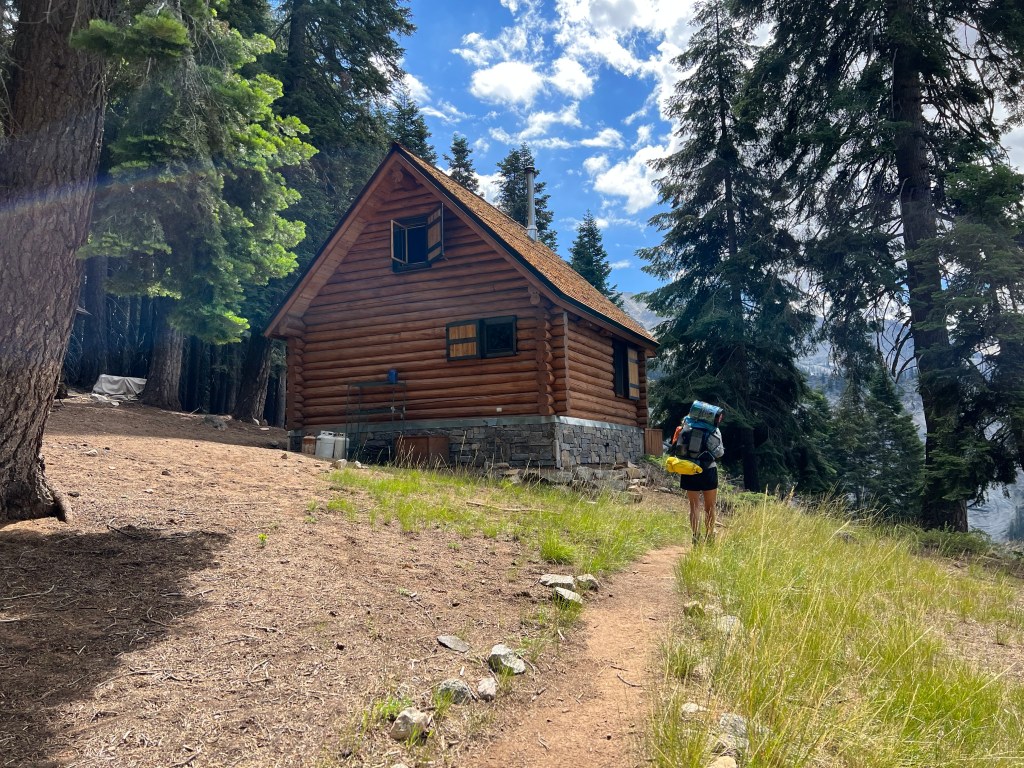
After you pass Bearpaw High Sierra Camp, you cross the spectacular Great Western Divide.
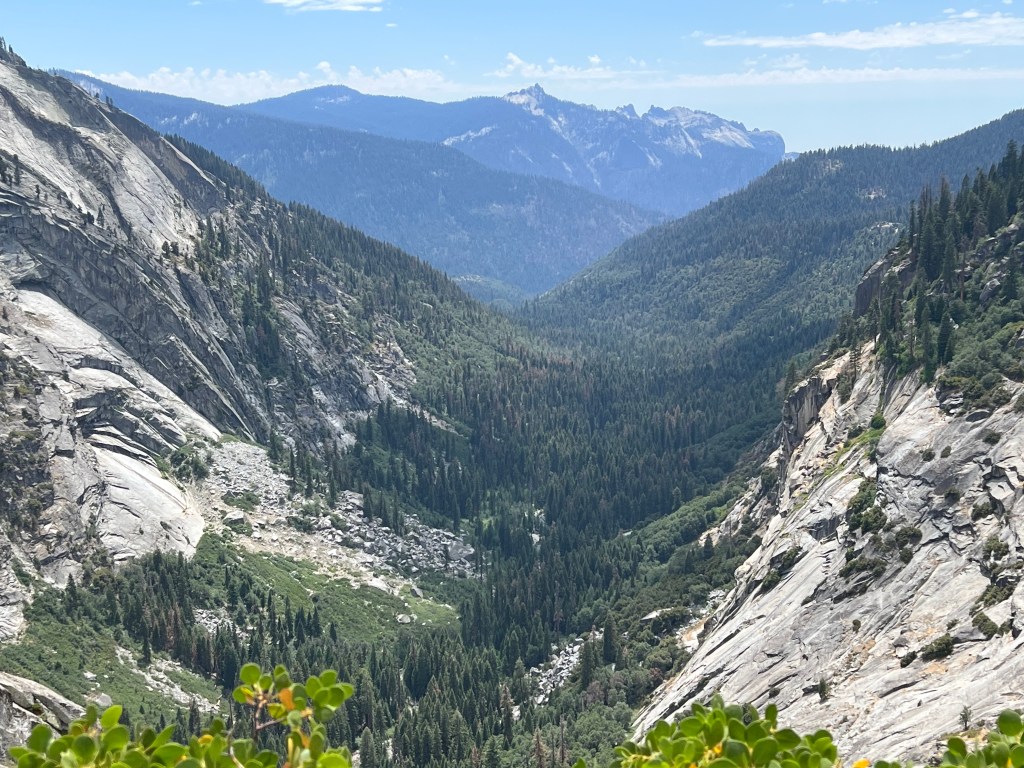
This section on the way to Hamilton Lakes, is nothing short of spectacular. There will be cascading waterfalls, twisted granite formations all around.

Once through the Great Western Divide, the picturesque Hamilton Lakes and towering rock formation, Angels Wings, referred to as Valhalla , waits on the other side, which is also a popular rock climbing spot.
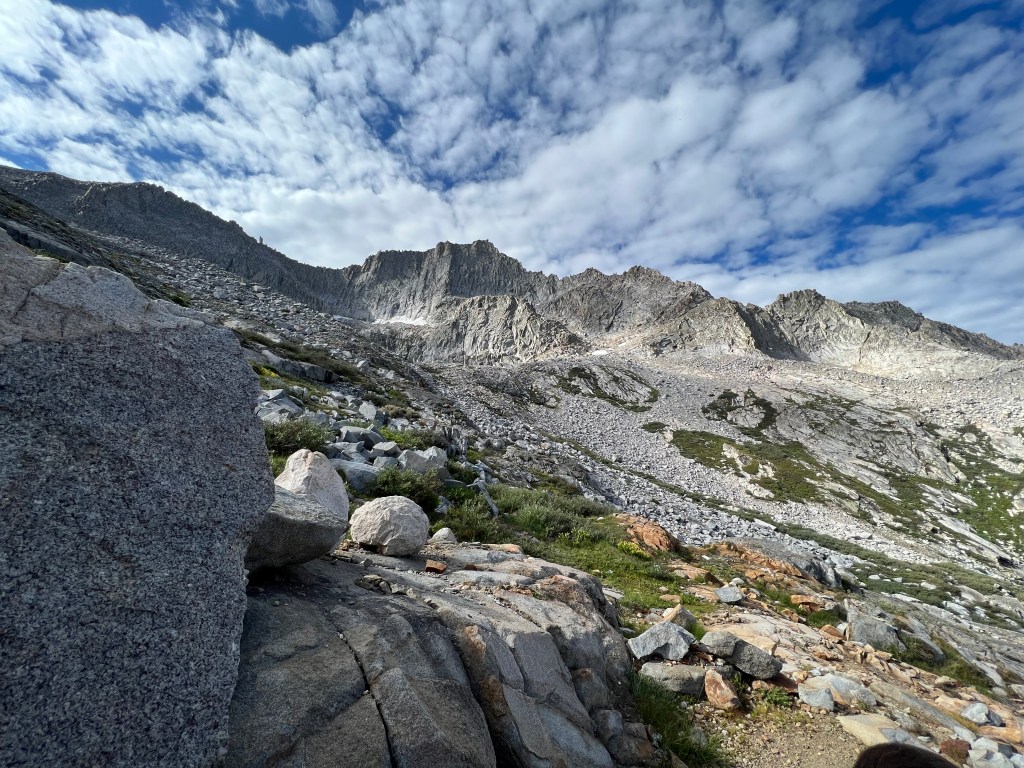
After Hamilton Lakes you climb higher towards Precipice Lake.
Next you pass trough the Kaweah Gap into the u-shaped valley, of the Nine Lakes Basin.
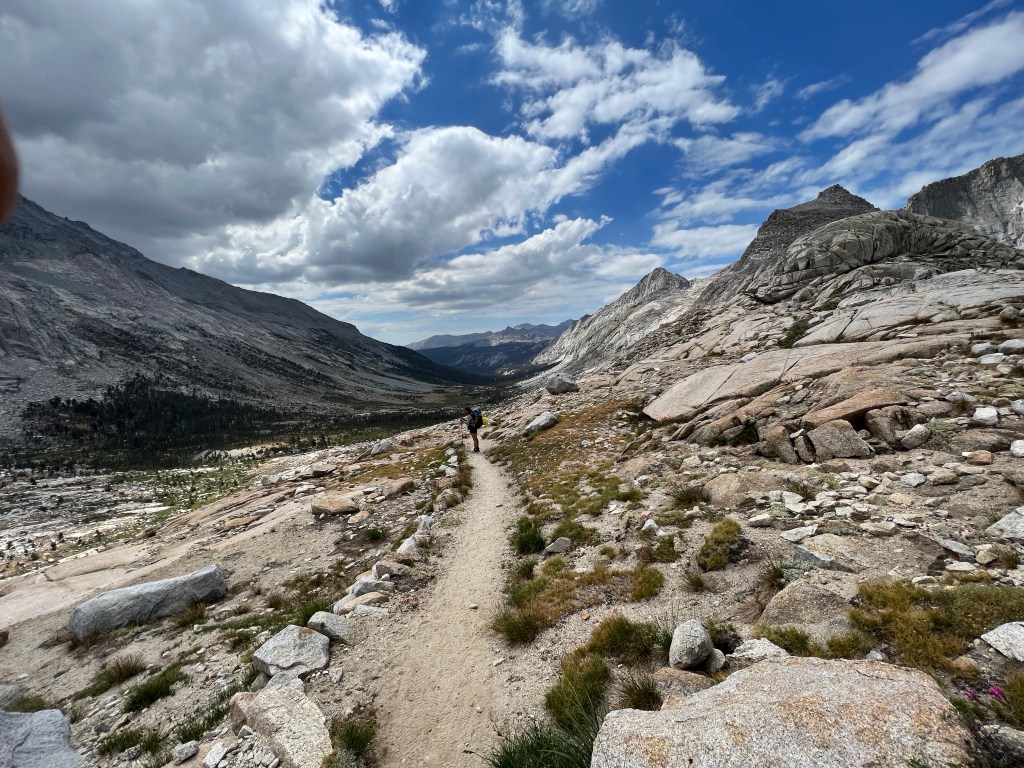
As you trek on to Big Arroyo, passing through a pymgy forest of lodgepole and foxtail pines, your are surrounded by several beautiful and somewhat jagged looking peaks.
You may spot Sawtooth Peak, as you hike along the stream on to Big Arroyo.

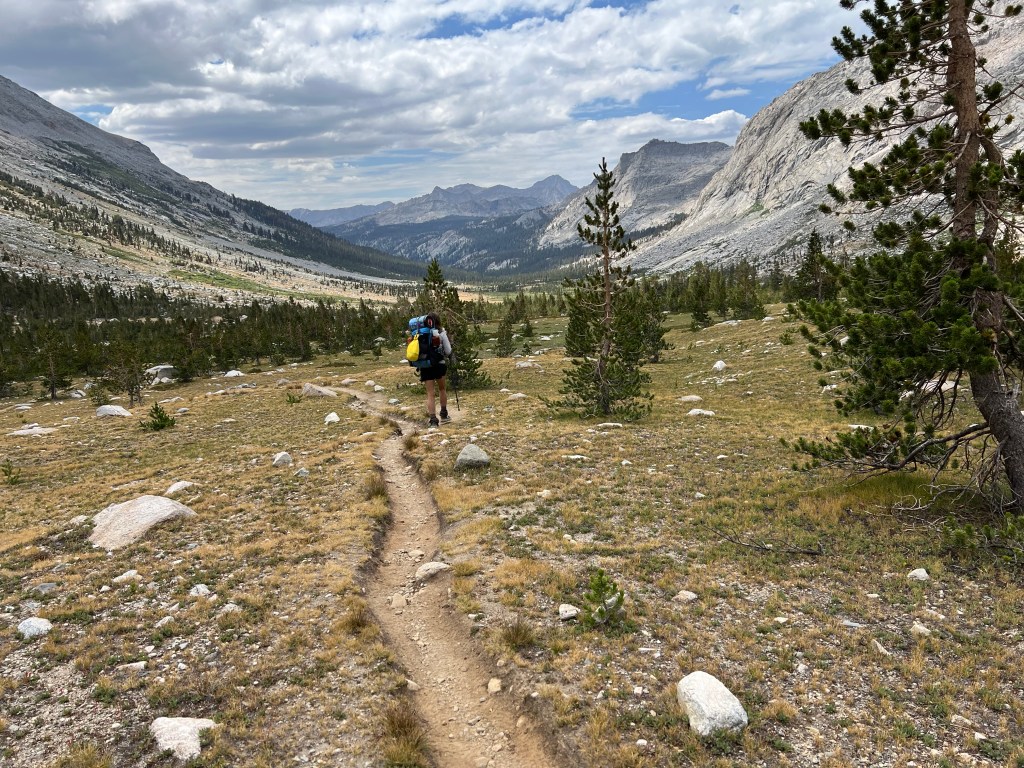
At Big Arroyo, you will find one of the most picturesque mountain meadows anywhere, along with an old cabin, and many mosquitos, perhaps the one caveat about this campsite.
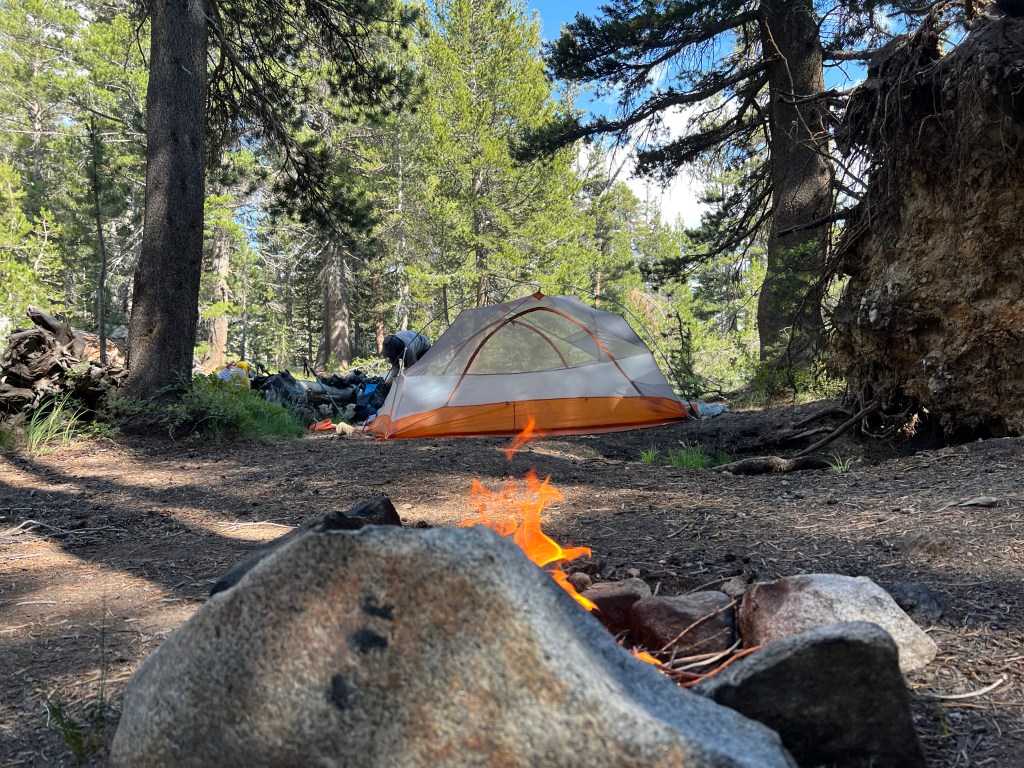
You can have a relaxing campfire here, and hopefully scare the bugs away.
Leaving Big Arroyo, includes a big climb over several switchbacks, beneath the towering barren Kaweah Peaks.
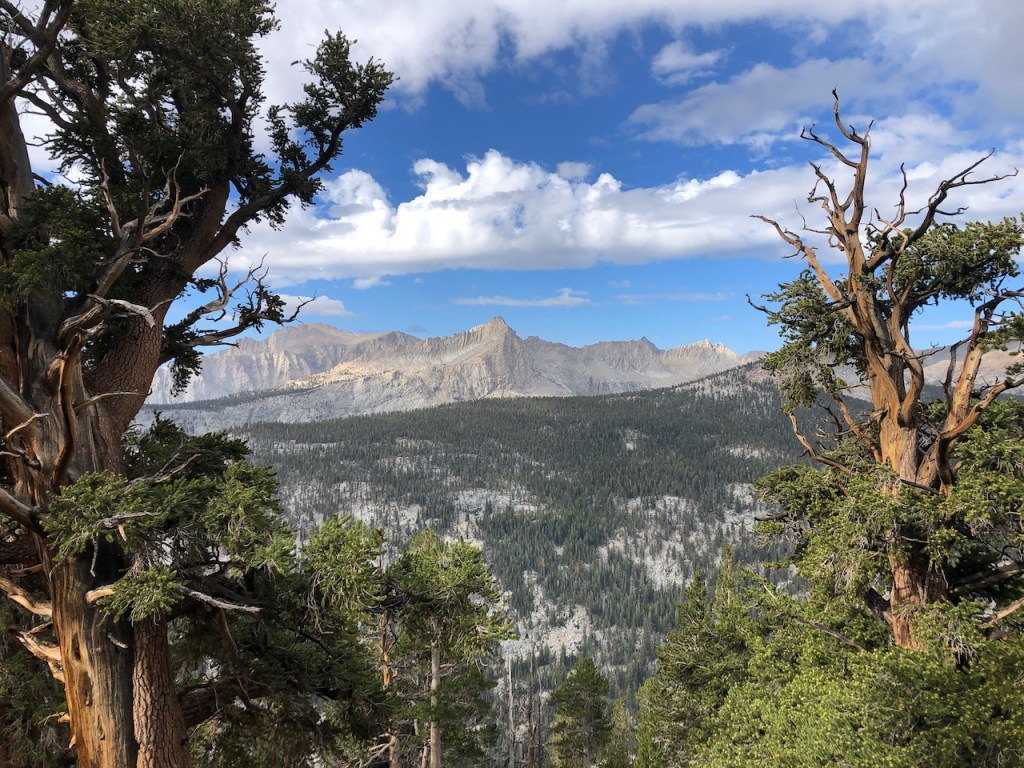
Here you can get a perfect view of the high peaks of Mineral King, such as Sawtooth Peak.
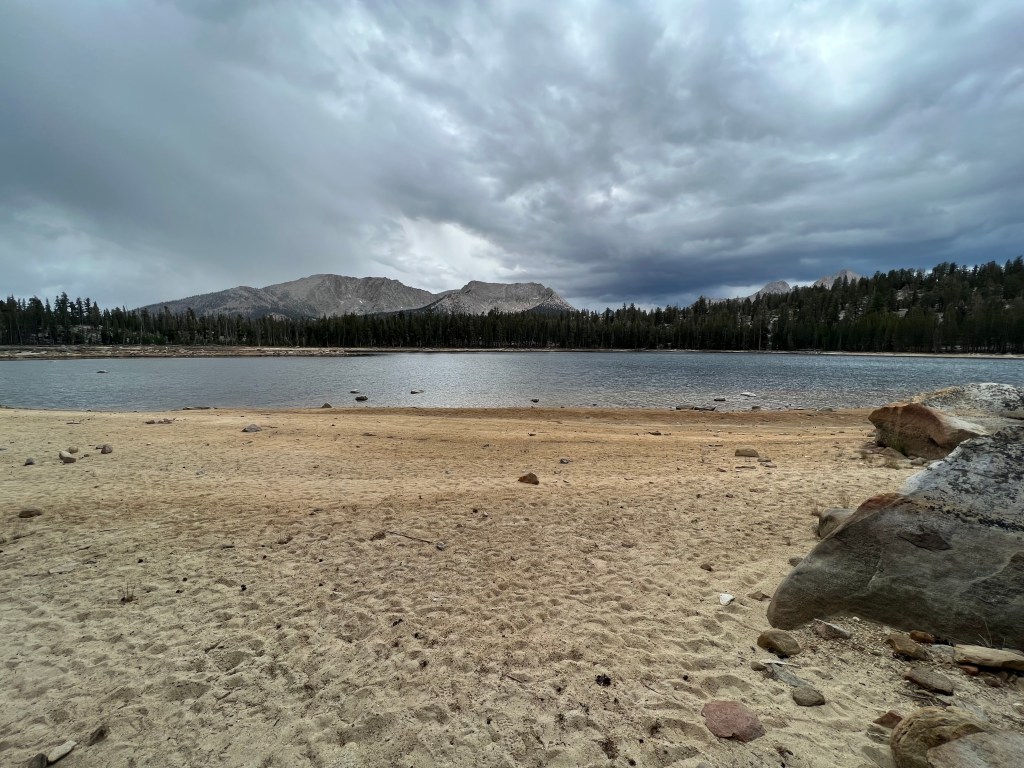
As you pass by Moraine Lake, another lovely Sierra lake, with a sandy beach, you get your first glimpse the high peaks of the Eastern Sierras.
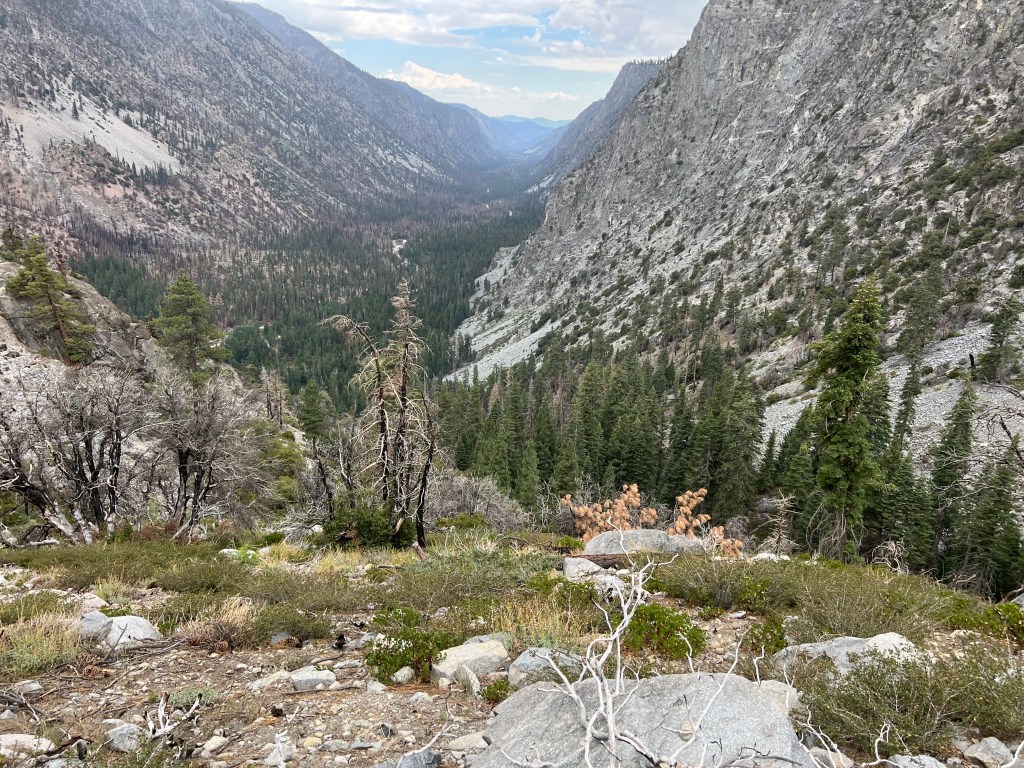
After trekking on past Moraine Lake, the Kern River Gorge, and its steep switchbacks await.
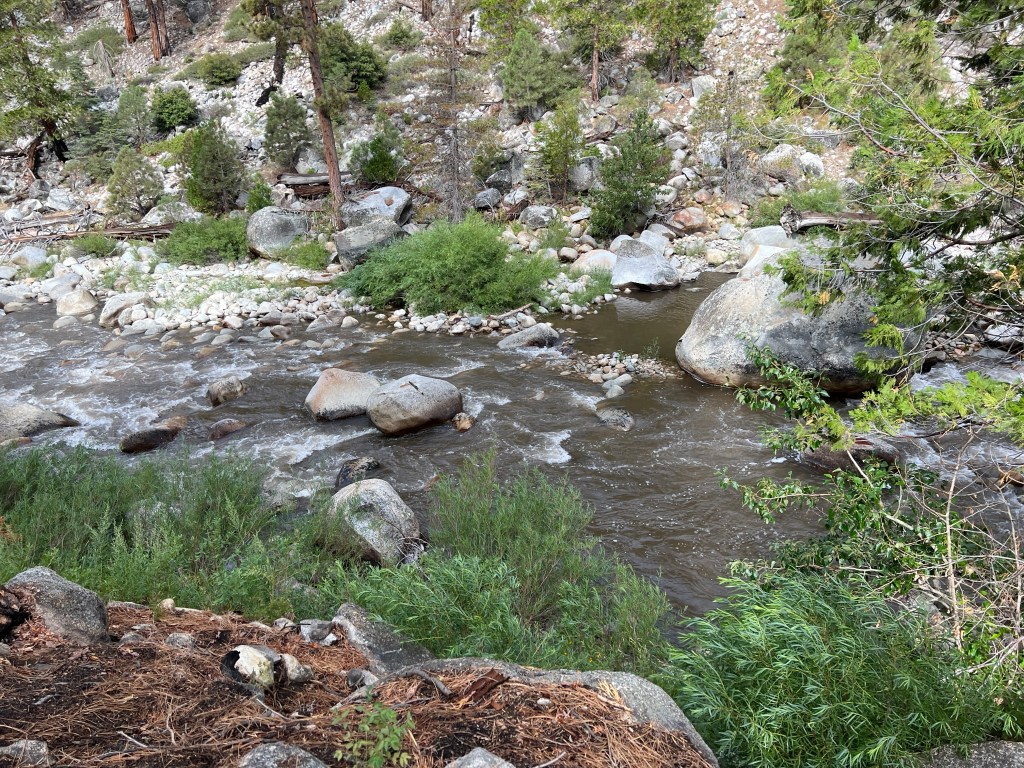
You will likely be anxious to cool off in rushing waters of the Kern River, or relax at the hot spring. Nobody is advised to swim in the Kern, but sticking to the rock pools near shore, and the hot spring, is the safest way to enjoy this river.

The ghost forest past Kern River Hot Springs was next, and it was quite eerie.
The climb from Junction Meadow on to Crabtree Meadows, will be one of the toughest climbs of the trip. So you may be too exhausted to take photos at this point. There is yet another beautiful waterfall, cascading down the gorge here, that is Wallace Creek, along with several others flowing into the gorge in the distance. You may decide on a refreshing dip in the trailside waterfall of Wright Creek, just shy of the saddle.

On past Wallace Creek is Crabtree Meadow, followed by Timberline Lake.
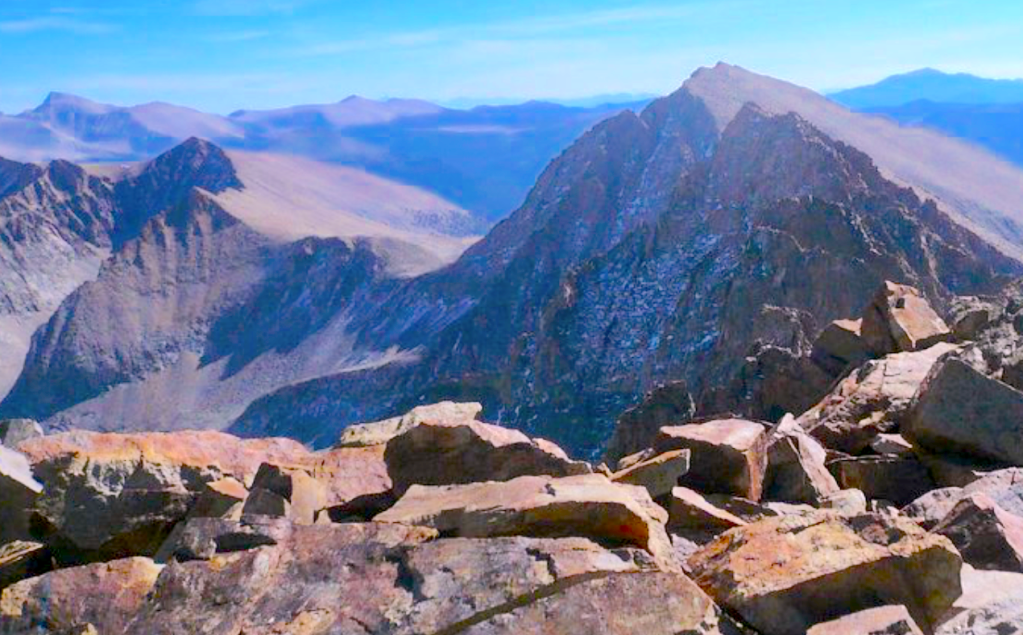
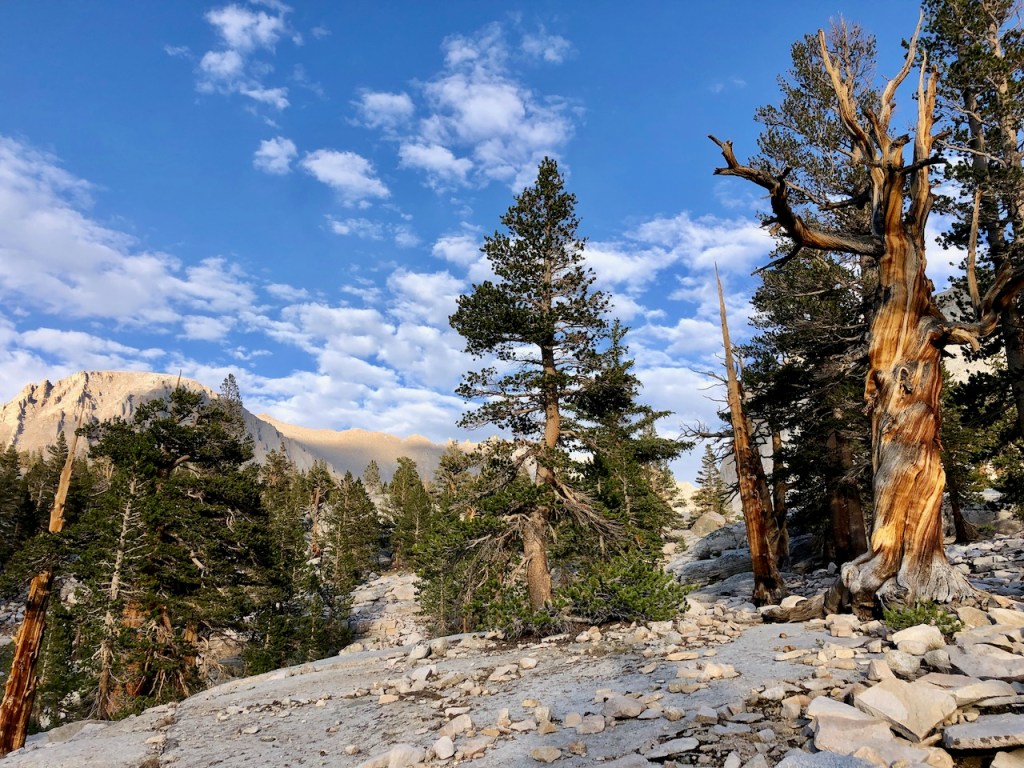
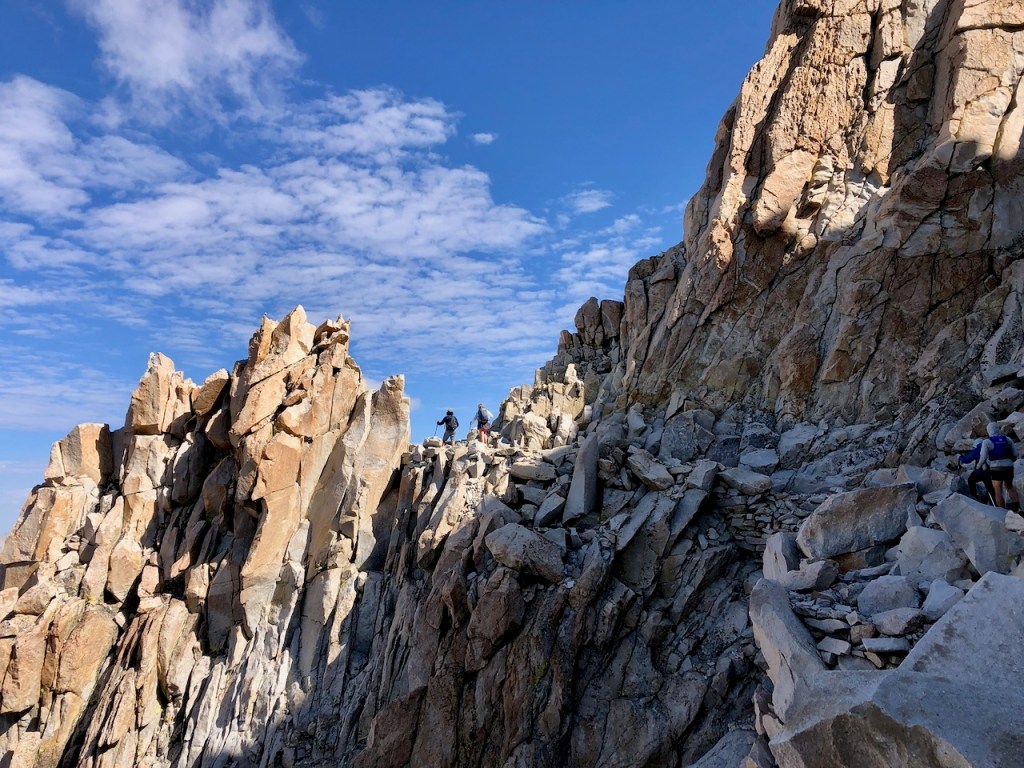
The next milestone is Guitar Lake, before finally ascending the switchbacks up to Mount Whitney. There is no shortage of beautiful alpine scenery, on this last stretch.
There is an awful lot of climbing left to do up Mount Whitney. Since you are essentially coming from just below 7000 feet to 14,501 feet in a short span or 1-2 days from the Kern River Gorge, you may be exhausted. We had climbed about 4000 feet from the Kern River Gorge on Day 5, and 3500 feet on Day 6, going over Whitney. I don’t recommend you doing the same.
Mount Whitney not only stands tall, with amazing views in all directions, it is like a sculpture garden. The alpine zone where few plants thrive may be barren, but is also so intriguing. I was drawn to this place like so many people before me. You simply have to see for yourself.
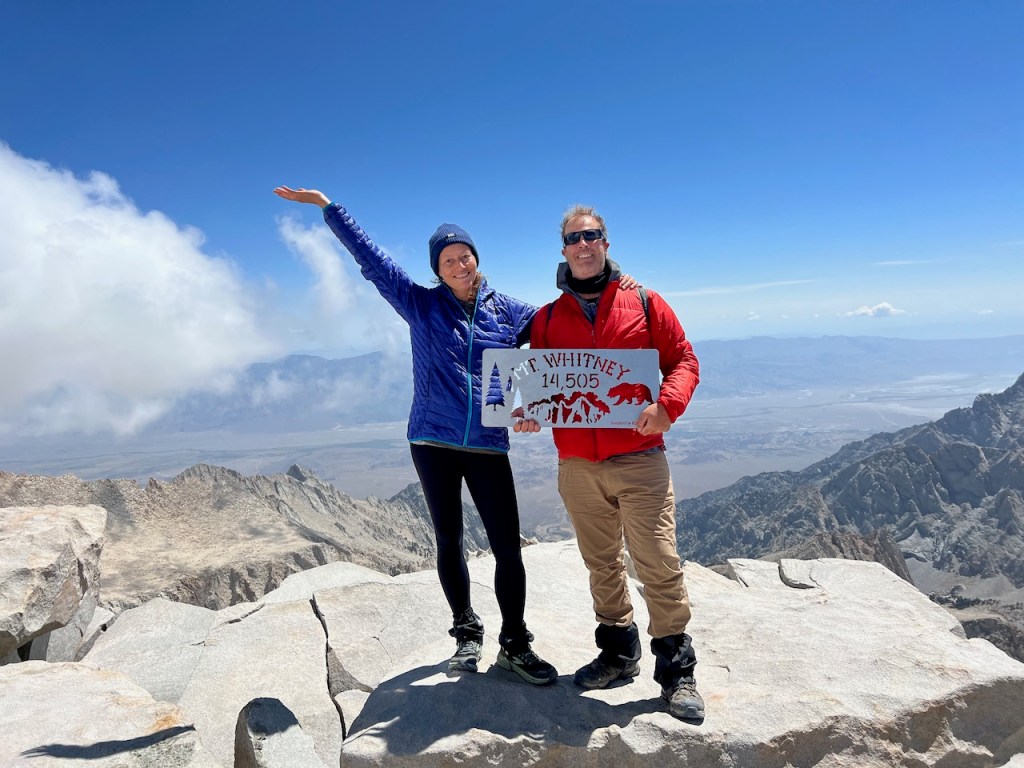
We made it to the top of Whitney, which is the highlight of the trip! We were fortunately able to get over Whitney before some storms, and rockslides closed the portal, so sometimes it’s worth it to go that extra mile, if it ensures your safety.
My Planned Itinerary
I had a rough estimate of how many miles I would hike each day, and planned for spending longer in the Sierras, bringing extra food. I planned on hiking to Bearpaw Meadow on Day 1, on to just past Precipice Lake on Day 2 (to an area the ranger recommended by Kaweah Gap, on to Kern River Hot Springs on Day 3, on to Crabtree Meadow Day 4, on to Guitar Lake Day 5, over Mount Whitney Day 5 on to Trail Camp, and to the portal on Day 6.
My Actual Itinerary
My actual itinerary was far different. I hiked far less miles on Day 1 than anticipated, only making it to 9 Mile Creek. On Day 2, I stopped at Hamilton Lake. I never planned on Big Arroyo on Day 3, due to hearing it had mosquitos, but that was where we stayed. Getting our gear soaked on Day 4 in the Kern River Gorge in a deluge, resulted in Day 5 being a yard sale at Kern River Hot Springs, with only 4 miles of hiking the following day. Nothing prepared us for hiking almost 15 miles with over 3000 feet of gain from 2 miles south of Junction Meadow all the way to Guitar Lake, arriving at close to 8pm there on Day 6. Our last full day we went up Mount Whitney, up 3500 feet of gain, and down another 4000 feet, all the way to Outpost Camp, for Day 7. It would just be 3 miles the following morning, down to the portal.
| 7/24/22 | Begin HST in Sequoia Park to Nine Mile Creek |
| 7/25/22 | Nine Mile Creek to Hamilton Lakes |
| 7/26/22 | Hamilton Lakes to Big Arroyo |
| 7/27/22 | Big Arroyo to Kern River Hot Springs |
| 7/28/22 | Kern River Hot Springs to another Kern River Campsite before Junction Meadow |
| 7/29/22 | Kern River Campsite to Guitar Lake |
| 7/30/22 | Guitar Lake to summiting MT Whitney and on to Outpost Camp |
| 7/31/22 | Outpost Camp at Whitney Portal |
80+ Miles
The mileages stated are definitely very off. Do no go off alltrails, or the NPS for mileages. The actual mileage is close to 85 miles. Add 2 miles per day to your itinerary give or take. Even 2 miles, can throw you off. It sure did for me. Imagine it’s 5:30 pm, and I’m expecting to be at Nine Mile Creek and I don’t get there until 7:30? That’s because Nine Mile Creek is 11.5 miles in from the trailhead at Crescent Meadow. Until next time Sierras!
I hope you enjoyed reading this, and it is helpful in knowing what to expect, should you decide to visit here.
#mc_embed_signup{background:#fff; clear:left; font:14px Helvetica,Arial,sans-serif; width:600px;} /* Add your own Mailchimp form style overrides in your site stylesheet or in this style block. We recommend moving this block and the preceding CSS link to the HEAD of your HTML file. */Subscribe
![]()
About me
I’m Serafina! I’m a writer and California girl who loves to go exploring. Hope you will get outside today, breathe some fresh air, and be happy!
Follow my Journey…
Be sure to Like and Subscribe to My Youtube Channel where I post videos!
Disclaimer: The work on this blog is my opinion and my opinion alone and I am not responsible for the outcome if someone were to apply these thoughts to their own life. All text and photography copyright 2023 by Serafina, all rights reserved. Information and opinions provided are kept current to the best of the author’s ability. All readers’ usage of the ideas and opinions presented in the blog, are at their own risk. Be aware of the possible dangers of hiking, surfing, walking, cooking, and other activities, which may take place indoors or outdoors. By reading this, you agree not to hold the author or publisher of the content on this web site responsible for any injuries or inconveniences that may result from reading the blog, or partaking in any activity mentioned in the blog. Read the blog, and use its ideas, if you so desire, at your own risk.

[…] You can read more about my process of planning for the High Sierra Trail here. […]
LikeLike